

Avoid Ruined Jackets: 6 Step Shop Tested DTF on Nylon Workflow
DTF works on nylon, but only if you throw out your cotton settings first. Drop the temperature to the lower end of the recommended range, extend the dwell time moderately, use light to medium pressure, and always perform a cold peel. Test on the actual garment before running a full order. Heavily coated or laminated shells with a strong water-repellent finish may not take a bond at all.
TL;DR:
- Lower the temperature and extend dwell time when pressing DTF on nylon to avoid glazing, with recommended ranges around 248 to 285°F.
- Always perform a test on a hidden seam or scrap before full treatment to prevent damaging the garment or creating defects.
- Cold peel is essential for nylon transfers to prevent lifting and ensure proper adhesion after cooling.
- DWR-coated or laminated nylon garments are often incompatible with DTF and may require pre-testing or outright rejection.
- Use a consistent press sequence, including pre-warming the platen and post-press sealing, and keep detailed logs to improve reproducibility and troubleshoot issues.
Table of Contents
- What Temperature and Pressure Work Best for DTF on Nylon?
- How Do You Press DTF on Nylon Step by Step?
- Why Do DTF Transfers Glaze, Lift, or Bubble on Nylon?
- How Do You Calibrate Settings Before a Full Run?
- How Should Customers Wash Nylon DTF Prints?
- When Should You Press DTF on Nylon Yourself?
- Order Pre-Tested DTF Transfers Instead of Guessing on Nylon
- Where to Verify These Settings Yourself
- Sources
- FAQ
What Temperature and Pressure Work Best for DTF on Nylon?
Nylon melts and glazes at temperatures that cotton shrugs off. That’s the entire problem, and it’s why copying your t-shirt settings onto a nylon windbreaker usually ends in a shiny, warped patch instead of a clean print. Cotton and poly blends tolerate relatively high temperatures without much damage. Nylon shows stress at lower temperatures, so it requires a narrower processing window and less room for error.
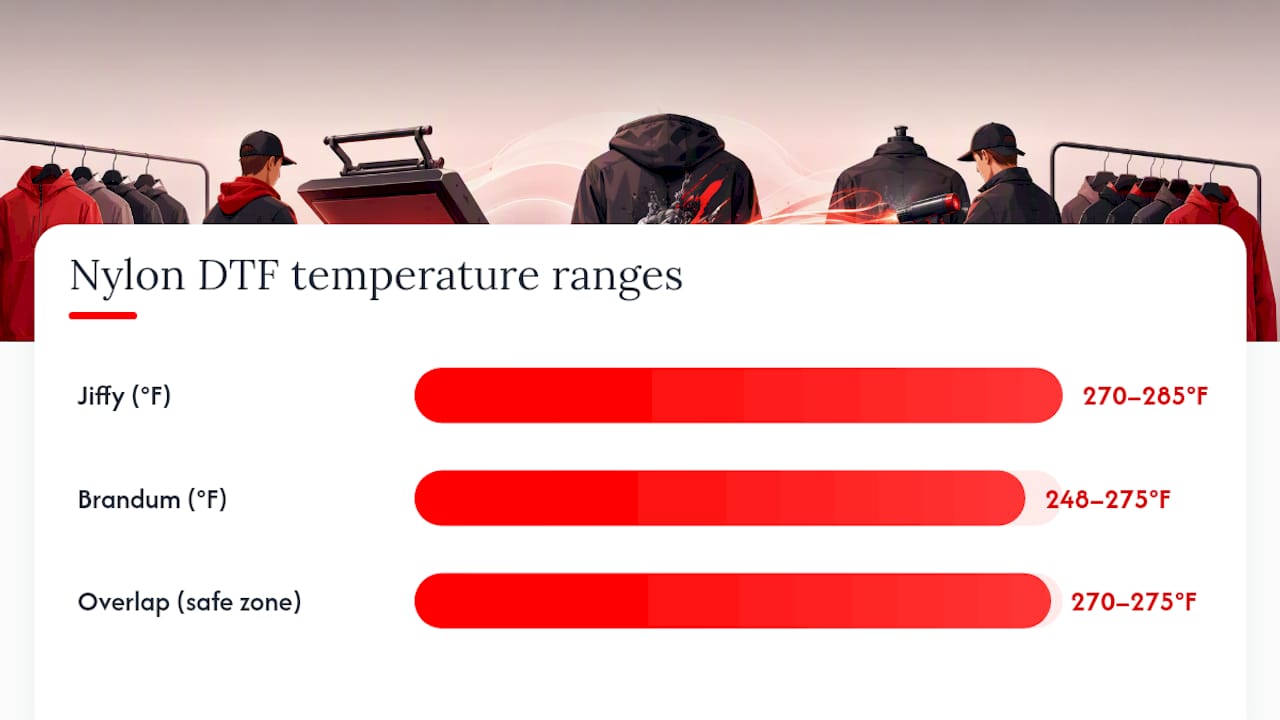
Two independent settings charts land in roughly the same place. Jiffy’s application guide recommends 270 to 285°F for 12 to 15 seconds at medium pressure with a cool or cold peel. Brandum’s heat press chart puts nylon at 120 to 135°C, which is about 248 to 275°F, for 15 to 20 seconds at light to medium pressure, also with a cold peel. The overlap tells you where the safe zone actually sits.
The trade-off strategy matters more than any single number. When a print isn’t bonding, the instinct is to crank the heat. Don’t. Joto Imaging Supplies recommends a specific order of adjustments: lower the temperature first, then add dwell time, then increase pressure. Changing two variables at once means you’ll never know which one fixed it, or which one ruined the next shirt.
| Fabric type | Temperature | Time | Pressure | Peel |
|---|---|---|---|---|
| Cotton | Moderate-high temperature | Short time | Medium-firm | Warm peel |
| Poly blend | Moderate temperature | Short time | Medium | Warm peel |
| Nylon | Lower temperature range | Longer time | Light-medium | Cold peel |
A few notes worth flagging before you press anything:
- Cold peel is recommended on nylon because peeling while warm risks lifting the film before the adhesive fully sets.
- If the garment has a durable water repellent (DWR) coating, drop toward the low end of the range or decline the job.
- Puckering around the print is a sign you’re running too hot for too short a time. Extend dwell before you touch the dial again.
How Do You Press DTF on Nylon Step by Step?
A clean nylon press comes down to sequence as much as settings. Skip a step and the numbers on your chart won’t save you.
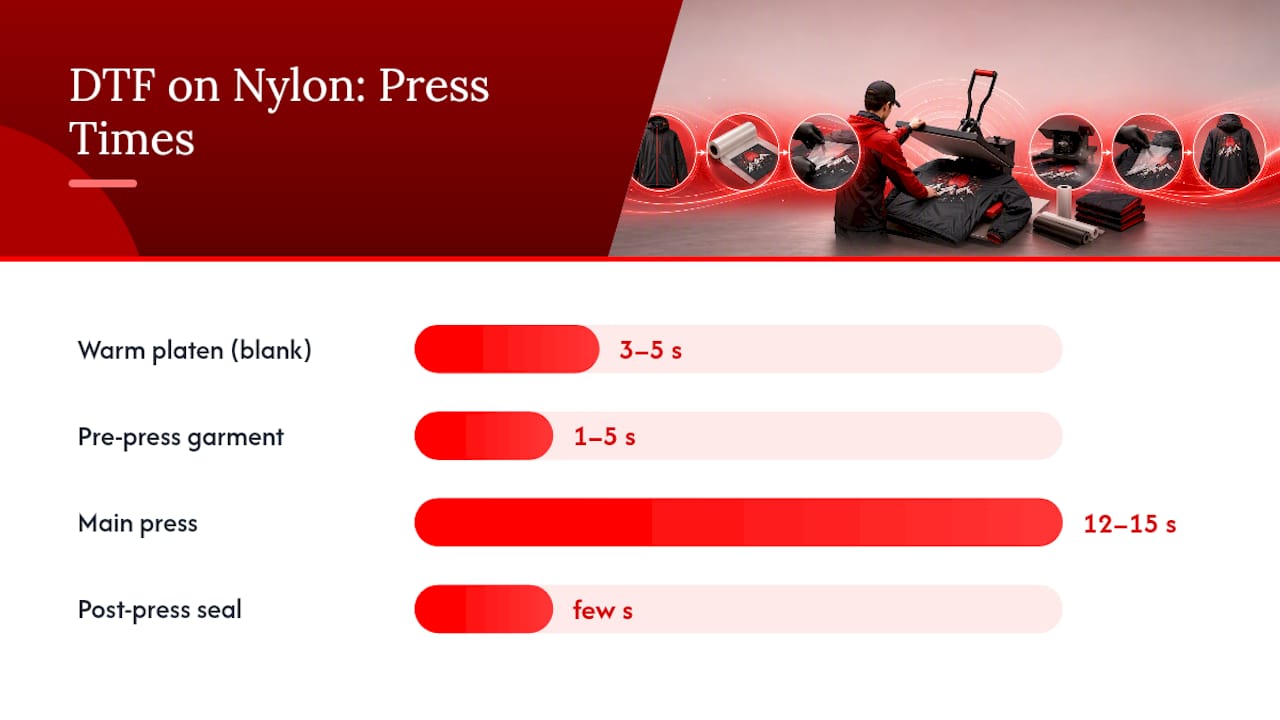
- Warm the lower platen first. Run a blank press for 3 to 5 seconds before the actual job. A cold lower platen pulls heat away from the garment and causes uneven bonding, according to Rogue Transfers.
- Pre-press the garment. One to five seconds, depending on thickness, removes creases and surface moisture that would otherwise trap steam under the film.
- Place the transfer and cover it. Use kraft paper, parchment, or a Teflon sheet over the design before pressing.
- Press at your chosen setting. Start at the low end, around 270°F for 12 to 15 seconds at light to medium pressure, and adjust from there.
- Cold peel. Wait for the print to fully cool before lifting the film.
- Post-press seal. A short second press, a few seconds at slightly lower heat, improves flexibility and helps the adhesive fully cure into the weave.
Pro Tip: Keep a simple log for every nylon job: platen temp, dwell, pressure setting, and peel result. When you hit a fabric that behaves differently, you’ll have a baseline to compare against instead of guessing from scratch.
This sequence matters more on nylon than on cotton because you have less thermal margin for mistakes. Pressing on artwork that’s properly sized and prepped before it ever reaches the platen also cuts down on placement redos, which means fewer total heat cycles on a fabric that doesn’t love repeated heat exposure.
Why Do DTF Transfers Glaze, Lift, or Bubble on Nylon?
Most nylon failures trace back to one of five patterns, and each has a distinct fix.
- Glazing. A shiny, hardened patch where the fabric got too hot for too long. This is usually permanent. Prevention beats repair here, so drop your temperature 10 to 15 degrees on the next attempt.
- Edge lifting. Corners peel up after cooling. Check peel timing first (you may have peeled too warm), then pressure, then surface contamination like fabric softener residue.
- Puckering. Small ripples around the design mean localized shrinkage. Lower the temperature or shorten dwell where the fabric allows, and stabilize the garment flat during the press so it can’t shift.
- Bubbles or residue. Wipe the platen and garment with a lint-free cloth before pressing, and check that your press surface is actually flat. Uneven pressure often leaves trapped air pockets.
- Wash failure. The print looked fine off the press but cracked or lifted after laundering. This almost always means the bond never fully cured, which points back to dwell time being too short.
If a garment has a laminated shell, taped seams, or a heavy DWR finish, it may be worth declining the job outright rather than risking a customer’s jacket. Tell them plainly that the coating repels the adhesive at a molecular level, and offer a swatch test instead of a guess.
How Do You Calibrate Settings Before a Full Run?
Every unfamiliar nylon garment deserves a quick test before it goes anywhere near a full press cycle.
- Run the water-bead test. Drop a small bead of water on an inside seam. If it beads up rather than soaking in, you’re dealing with a DWR finish, and that coating is designed specifically to repel liquids, which includes molten adhesive.
- Warm the lower platen with a blank 3 to 5 second cycle before the first real press of the day.
- Test on a hidden seam or scrap. Press, let it cool completely, then inspect for glazing, lifting, or texture changes before committing to the visible garment.
- Wash test if time allows. Some bond failures only show up after laundering, so a cold inspection alone doesn’t guarantee durability. SGIA’s industry guidance backs wash testing as the real validation step, not just a visual check.
- Log everything. Actual platen temperature (checked with an infrared gun if your display seems off), dwell, pressure, peel behavior, and any visible issues.
Pro Tip: A number on a digital readout isn’t always the real platen temperature. Spot check with an infrared thermometer every so often, especially after your press has been running a long shift.
Handmadeohiocrafts uses this exact test-then-log approach on unfamiliar performance fabrics, and it’s the difference between one ruined jacket and a repeatable setting you can hand off to anyone in the shop.
How Should Customers Wash Nylon DTF Prints?
Aftercare determines whether a nylon print survives six months or six washes. The instructions are simple enough to hand a customer on a card.
- Wash inside-out in cold water on a gentle cycle.
- Skip fabric softener and bleach entirely. Both break down the adhesive layer over time.
- Air dry when possible. If you must tumble dry, use low or no heat, and keep it brief.
- Never iron directly on the print. If wrinkles need attention, use a protective sheet and low heat, or steam from the reverse side.
A short version for a hang tag or order note: Wash cold, inside-out, gentle cycle. No bleach, no fabric softener. Air dry or tumble on low. That one line prevents most of the return requests that come from a print looking worn after a few washes.
When Should You Press DTF on Nylon Yourself?
DTF earns its keep on nylon for small-color, short-run jobs where screen printing setup time doesn’t pencil out, and that complementary role between the two methods is well documented in trade coverage. But nylon shrinks your margin for error in a way cotton never does. If a customer hands you an unlabeled jacket with an unknown coating, or the stakes of ruining it are high, outsourcing to a shop with a tested process beats guessing on someone else’s garment.
— Aaron
Order Pre-Tested DTF Transfers Instead of Guessing on Nylon
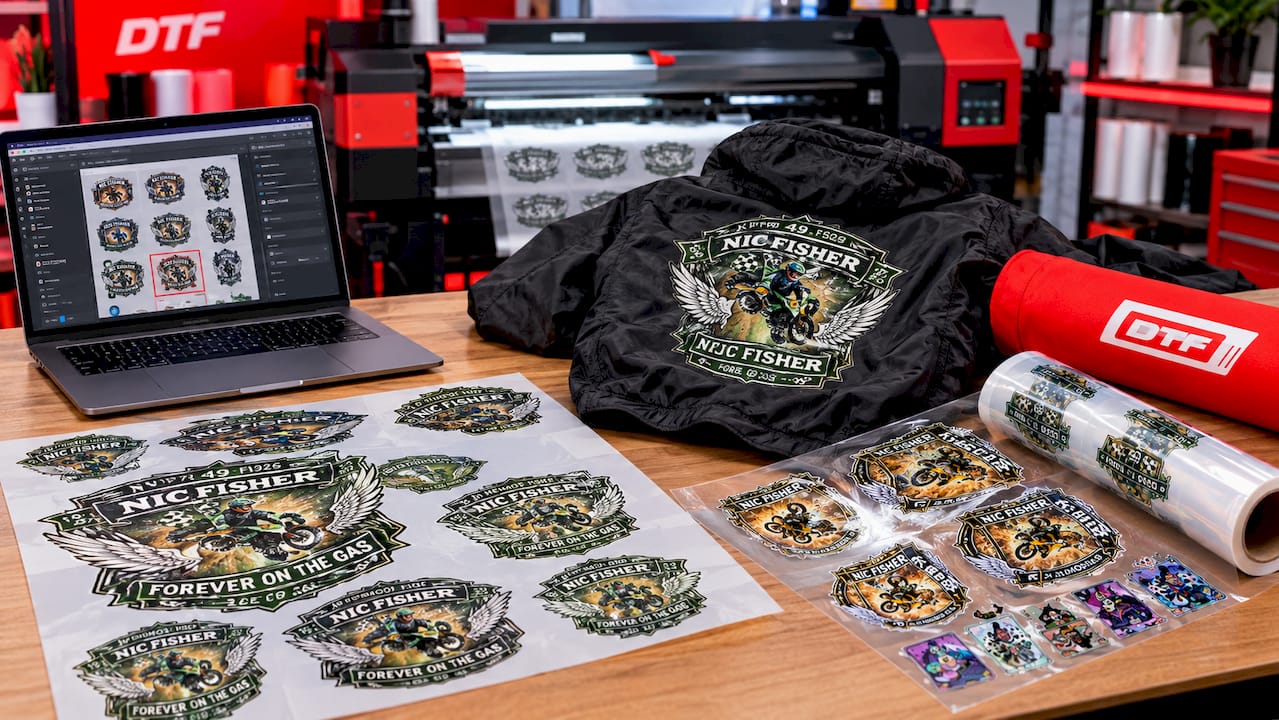
Using a specialist service is an alternative to trial-and-error pressing when you don’t want to risk a customer’s jacket on settings you’re still dialing in. We produce custom DTF transfers with pressing notes included, so you get a starting temperature, dwell, and peel timing specific to your artwork instead of a generic chart.
If you’re outfitting a team or a sideline crowd, our custom game day mom sweatshirts and basketball mom sweatshirts come finished and wash-tested, no press required on your end. Prefer to handle the pressing yourself but skip the guesswork on file setup? Check our DTF file requirements guide before you upload artwork, then order a test panel first. Turnaround runs fast, and you can request a wash-tested sample alongside your first order to confirm the bond before committing to a full batch.
Where to Verify These Settings Yourself
Cross-check any nylon setting against ASTM International’s textile testing standards if you need documentation for a client or a formal spec sheet. Trade resources like the sources cited throughout this guide are a faster starting point for day-to-day shop work.
Sources
- DTF Application Guide for Nylon and Performance Materials | Jiffy
- DTF on Nylon and Waterproof Technical Fabrics - Joto Imaging Supplies
- How to Print DTF Transfers on Nylon Like a Pro – Rogue Transfers
FAQ
Can I heat press 100% nylon?
Yes, but at a lower temperature than cotton or poly, typically 248 to 285°F, with a longer dwell time and a cold peel. Always test on a hidden seam first since nylon glazes easily.
Can you put DTF transfers on plastic or hard surfaces?
Standard DTF transfers are made for fabric and won’t bond properly to plastic or rigid surfaces; hard surfaces need a UV DTF decal instead, which uses a different adhesive system designed for non-fabric materials.
Can DTF go on any fabric?
DTF works on most woven and knit fabrics, but heavily coated, laminated, or heavy DWR-treated performance shells may resist bonding entirely. A quick water-bead test on an inside seam tells you what you’re dealing with before you commit a full press cycle.
Can DTF be used on spandex?
Yes, spandex and stretch blends generally take DTF well at slightly reduced temperatures and shorter dwell times than nylon, since spandex has different heat tolerance than the coated performance shells that cause the most trouble.